Hello there, ladies and gentlemen. It seems I haven’t written anything on this blog for a while. For those of you who think I’m already dead: I’m not. I’m still here – alive and kicking!
Anyway, today, I’ll be posting my write-up for picoCTF 2017 which closed this last April 14. I didn’t get to work on it as much as I’d like to because I was on a vacation trip in Japan for the most of the month but I did finish a handful of challenges in the little time I got to spend on it.
The website for the picoCTF game is located at https://2017game.picoctf.com/. It looks like the challenges are still solvable at the time that this write-up was written so I may add some additional sections into this article later on after the initial revision.
This CTF is targeted towards high school and college students so the challenges were quite easy as compared to your typical “Crazy Russian Hacker” CTFs. It features a story line presented in a Visual Novel form which is pretty neat and quite unique considering all the CTFs I’ve played thus far. However, I have yet to finish the story at the time that this article was written and I seem to have forgotten some parts of the story already because of how long my vacation was.
I wasn’t alone in trying to solve this CTF though. I was with a team called “HydraSec” and this team is pretty much composed of contributors to a blog I (have yet to) contribute to. The blog is called InfoSecPinas. And with that in mind, do note that I’ll only be writing about the challenges that I have solved and I’ll be skipping the challenges that were solved by someone else.
Alright then, hajimemashou!
Table of Contents
- Level 1
- Level 2
- Level 3
Level 1 – Binary Exploitation 40 (Bash Loop)
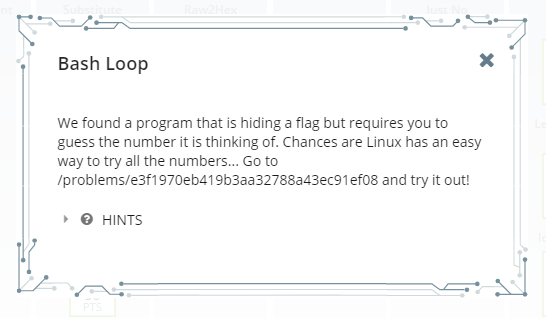
OK. So a program that’s thinking of a number. Essentially, it’s a program that generates a random number and then compares the user input to that number before showing the flag.
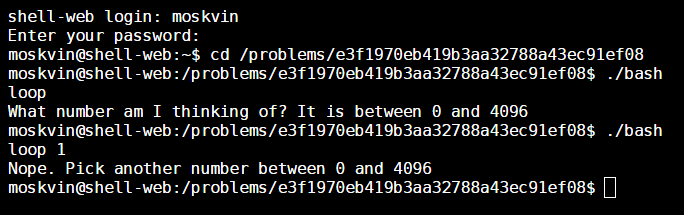
The approach is pretty straightforward: feed the program every number from 0 to 4096. In order to do this, simply paste the following line of bash code into the terminal and execute it:
cd /problems/e3f1970eb419b3aa32788a43ec91ef08; for i in {0..4096}; do RESULT=`./bashloop "$i"`; if [[ "$RESULT" =~ ^Nope.* ]]; then :; else echo "$RESULT"; break; fi; done;That should do the trick. After you do this, you’ll be greeted with the following message:
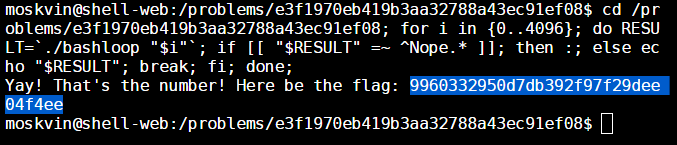
The flag is: 9960332950d7db392f97f29dee04f4ee if it wasn’t so blatantly obvious.
Now let’s move on to the next problem.
Level 1 – Binary Exploitation 40 (Just No)
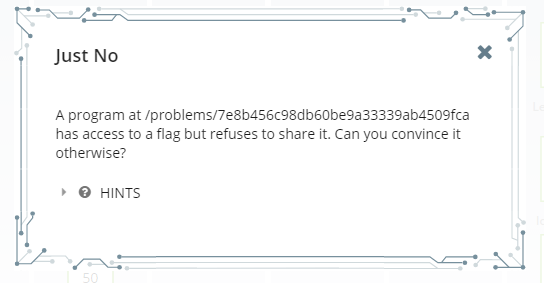
Wow. What a selfish program! Looks like this little fella is going to need some “convincing”. Alright, let’s begin. Navigate to the directory that the instruction is pointing at and look for that selfish program.

Now let’s fire it up.

Wow. K then fam. Looks like this isn’t going to be as straightforward as I thought. It mentioned something about an auth file so I’m guessing it’s the one named auth from when we did an ls in the directory (no shit Sherlock).
Let’s see what it says:

Well. There’s our problem. Let’s make that a “yes”.
Obligatory JoJoke. Moving on…

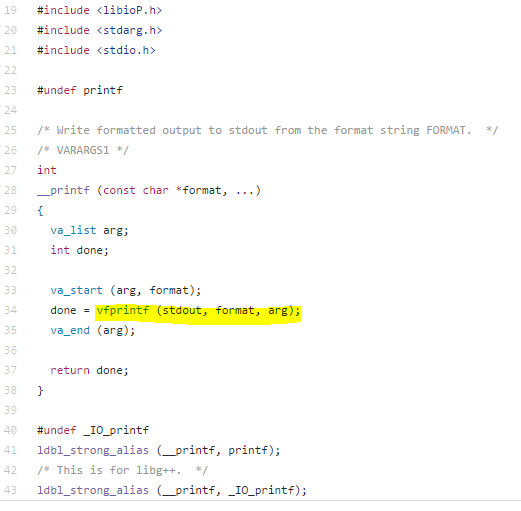
Well. That didn’t work out. Maybe this is where the provided source code for the binary comes in. Let’s take a look:
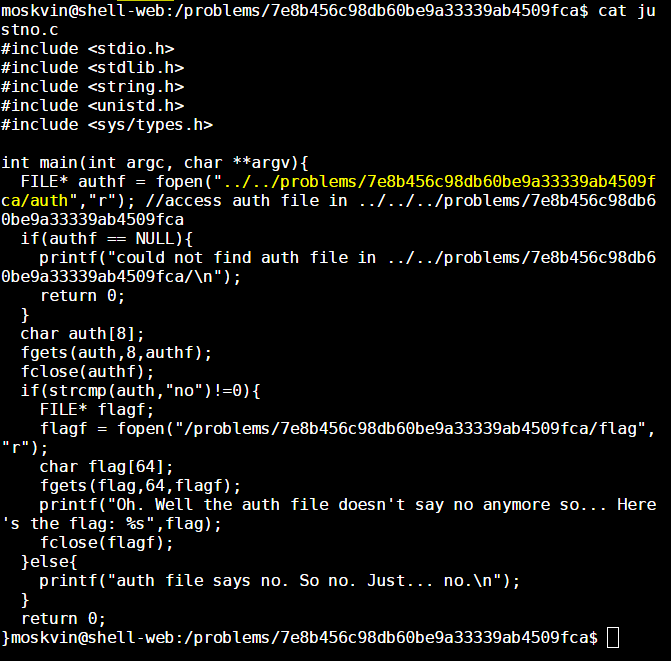
Now take a look at the highlighted section above. That’s our key to convincing the program to show us the flag.
What seems to be happening here is that the program looks for the auth file in a location that is relative to the current context of execution. It doesn’t look for it in an absolute location, so if we could move the current context of execution to a location where an auth file containing “yes” is accessible using the relative path ../../problems/7e8b456c98db60be9a33339ab4509fca/auth, then we could convince the program to show us the flag.
In order to do this, we first need to create an mock location containing an auth file with a “yes” inside. We’re going to have to do this under a directory that our current user account can control. I’d go with the $HOME directory because that usually belongs to the current user.

After creating the mock location, we now have to put the auth file with a “yes” inside of it inside our mock location.

Now here’s the important part. We have to move the current execution context in a location where the path ../../problems/7e8b456c98db60be9a33339ab4509fca/auth is accessible. Going inside the ~/problems/7e8b456c98db60be9a33339ab4509fca directory should do the trick.

Alright. So now, if we try to access the path ../../problems/7e8b456c98db60be9a33339ab4509fca/auth from the current context of execution, we’re going to get a “yes”.

Now that we have that in place. It’s just a matter of executing the program.

As you can see above, the flag is ddf649b13d560409d2649dc06f2a43ee.
If you don’t wanna be bothered to read the step-by-step instructions I have laid out above, simply paste the following code into the terminal and you would have solved this problem instantly.
mkdir -p ~/problems/7e8b456c98db60be9a33339ab4509fca; echo 'yes' > ~/problems/7e8b456c98db60be9a33339ab4509fca/auth; cd ~/problems/7e8b456c98db60be9a33339ab4509fca/; /problems/7e8b456c98db60be9a33339ab4509fca/justno;Level 1 – Reverse Engineering 20 (Hex2Raw)

OK. First reverse engineering problem of the game. Let’s do as it says and go CLI ourselves to the indicated location.

Let’s try running the program shall we.
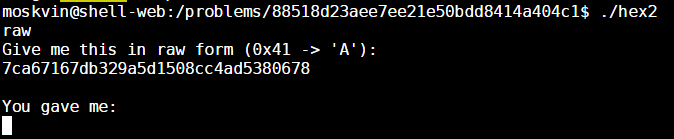
Alright. I think I get what it’s getting at. It’s asking us to provide the “raw” form of the hex string that it’s providing us. For example, if you see a 41 in the provided hex string, you have to give it an “A” at that location because the “A” character is represented by the hex value 0x41.
The tricky part of this problem is that some of the values that it’s asking us to provide cannot by typed out on the keyboard. Luckily, there’s this neat little command line tool called echo which has a -e mode. This mode allows us to convert hex strings into to their raw character form.
For example, if we do an echo -e '\x41', the tool is going to print out an “A”.

Now all we have to do is echo out the hex string that the hex2raw program is asking of us and then push it into the hex2raw program. How do we do this you ask? By piping of course! Make sure you escape every hex value in the echo command with \x so they would be treated as hex values to be converted into raw form.
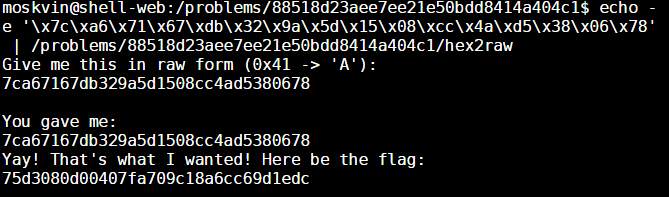
And now we have the flag which is: 75d3080d00407fa709c18a6cc69d1edc.
As you noticed earlier, the hex2raw program was asking for keyboard input. This is because keyboard input is the default “Standard Input” of all applications. When you pipe the output (i.e. the printed characters) of one program to another, the output of the previous program in the pipe becomes the “Standard Input” of the program in the later part of the pipe.
Anyway, if you don’t wanna be bothered with following each and every step indicated above, you can simply paste the following code into the terminal and the problem will be solved instantly.
echo -e '\x7c\xa6\x71\x67\xdb\x32\x9a\x5d\x15\x08\xcc\x4a\xd5\x38\x06\x78' | /problems/88518d23aee7ee21e50bdd8414a404c1/hex2rawLevel 1 – Reverse Engineering 20 (Raw2Hex)

This one is a pretty straightforward problem. The raw2hex program inside the indicated directory simply prints our flag in raw format, and we are going to have to encode that in hex form in order to determine the flag.
Let’s try running the raw2hex program.

Well, it seems that our console got messed up by running that program. No problem though. We just have to do an exit and reconnect.
Now this time, let’s pipe the output of the program into xxd – a command line tool which encodes raw data into a hex string.

And there’s our flag basically. I omitted the first twelve hex values because those represent the “The flag is:” portion of the string. We’re only interested in the actual flag in this case.
If you didn’t quite get that, the flag is 71c28db77578a80e38aae0d626d853a5.
Again, if you don’t wanna be bothered to follow the step-by-step instructions that I have laid out above, simply paste the following code into the terminal and you should instantly find the flag that you’re looking for:
cd /problems/40b1e663252261e8203962486523629e; ./raw2hex | xxd;To be honest, I don’t really see how this or the Hex2Raw problem count as reverse engineering problems.
Level 1 – Cryptography 50 (computeAES)
While I generally hate cryptography problems, I actually had quite a bit of fun doing this one. Alright, so if you click the “clue” link in the problem description, you will be redirected to a text file containing the following text:
Encrypted with AES in ECB mode. All values base64 encoded
ciphertext = rW4q3swEuIOEy8RTIp/DCMdNPtdYopSRXKSLYnX9NQe8z+LMsZ6Mx/x8pwGwofdZ
key = 6v3TyEgjUcQRnWuIhjdTBA==
OK, so it seems that we are already given both the cipher text and the key in base64 format. It’s just a matter of feeding the hex of the raw values of these base64 strings into an online AES decryptor in order to extract our flag.
So to begin, let’s convert the provided base64 strings into their raw value, and then convert those raw values into hex values that we can then paste into an online AES decryptor. We can do this by grabbing our console and running the following commands:
For hex encoding the cipher text:
echo 'rW4q3swEuIOEy8RTIp/DCMdNPtdYopSRXKSLYnX9NQe8z+LMsZ6Mx/x8pwGwofdZ' | base64 --decode | od -A n -t x1
           ad  6e  2a  de  cc  04  b8  83  84  cb  c4  53  22  9f  c3  08
           c7  4d  3e  d7  58  a2  94  91  5c  a4  8b  62  75  fd  35  07
           bc  cf  e2  cc  b1  9e  8c  c7  fc  7c  a7  01  b0  a1  f7  59
For hex encoding the key:
echo '6v3TyEgjUcQRnWuIhjdTBA==' | base64 --decode | od -A n -t x1
           ea  fd  d3  c8  48  23  51  c4  11  9d  6b  88  86  37  53  04
Alright. Now that we have the hex values for our cipher text and encryption key, let’s feed them to an online AES decryptor in order to extract the flag. For this problem, I used the one provided by OnlineDomainTools (http://aes.online-domain-tools.com/). Make sure the “Function” option is set to “AES” and the “Mode” option is set to “ECB”.
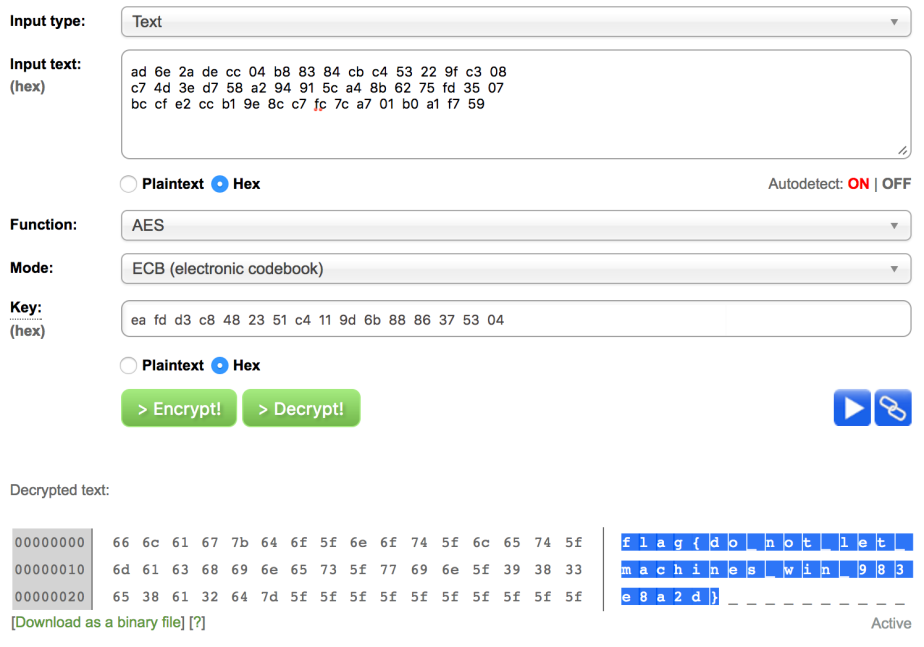
As you can see, the flag is flag{do_not_let_machines_win_983e8a2d}.
Level 1 – Miscellaneous 10 (Piazza)
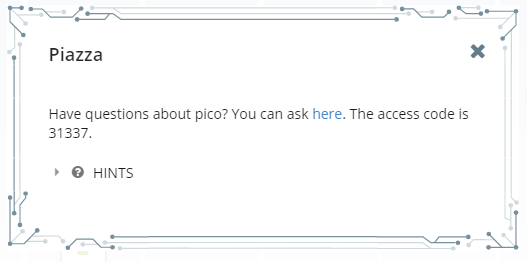
This one isn’t really a challenge. They just want you to register to their forum. For the sake of completeness, I’ll just write about it as well.
Anyway, just click the link, register for an account, and the flag is in one of the stickies of the forum that you’ll eventually end up in.

As you can see, the flag is flag{ask_and_hop3fully_we_can_help}.
Level 2 – Reverse Engineering 60 (A Thing Called the Stack)
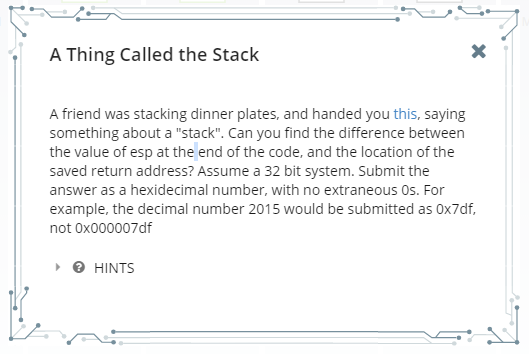
Upon clicking the provided link, your browser will download a piece of assembly code that you have to trace in order to find the answer to this problem. The assembly code in question is pasted in the following code block:
foo:
    pushl %ebp
    mov %esp, %ebp
    pushl %edi
    pushl %esi
    pushl %ebx
    sub $0x90, %esp
    movl $0x1, (%esp)
    movl $0x2, 0x4(%esp)
    movl $0x3, 0x8(%esp)
    movl $0x4, 0xc(%esp)
In this problem, you’re going to have to find the number of bytes between the location of the return address of the current frame and the top of the stack after the code has finished executing.
Now, let’s remember our registers again.
EBP: Points to the base of the current frame, i.e. the location just below the return address of the current frame.
ESP: Points to the top of the stack.
These are the only relevant ones for this problem. Now let’s get to dissecting the code.
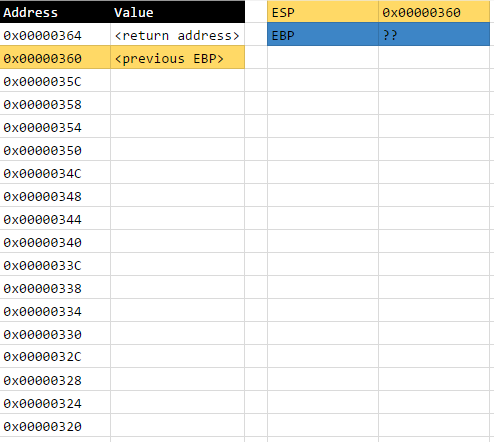
Line 1: foo:
In this line, we enter the foo function. It should really be call foo since that’s the actual instruction used to call the foo function from another function. When we enter a function, the return address gets pushed on top of the stack. When we “push” the return address on top of the stack, we mean the following:
- Decrease ESP by 4
- Write the address to return to (essentially, the current value of the IP or Instruction Pointer) in the address pointed to by ESP
We decrease because the stack generally grows downwards in most systems. We decrease ESP by 4 because we’re assuming a 32-bit system. In a 32-bit system, all addresses are represented by 32-bits or 4 bytes.
Assuming that the initial value of ESP is 0x00000368, current state of the stack will be as follows after this line has finished executing:
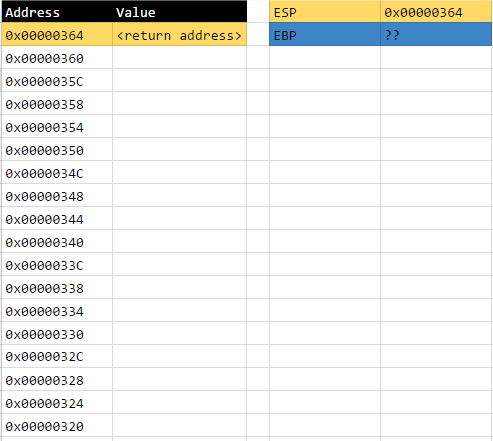
These addresses are only hypothetical by the way. It’s there just so we can visualise the problem better.
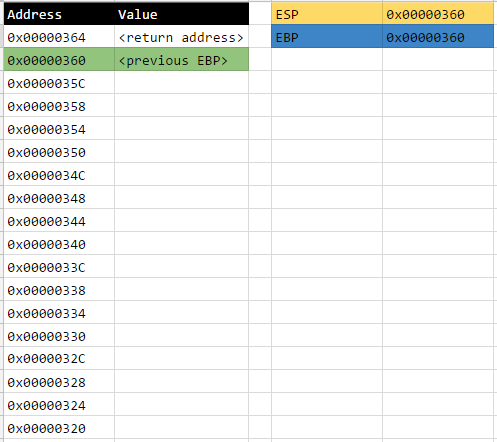
Line 2: pushl %ebp
In this line, we push the current content of the EBP register on top of the stack. The percent sign in the reference to the EBP register is simply compliance to an assembler requirement where percent symbols have to be prepended to register references.
Anyway, this instruction signifies the beginning of the creation of a new frame. The instruction pushl indicates that we are pushing a DWORD onto the stack. As we recall in our college computer science classes, a WORD is two bytes long, and a DWORD is four bytes long.
So essentially, what happens in this instruction is:
- Decrease ESP by 4
- Write the contents of EBP to the address pointed to by ESP
After this line has finished executing, the current state of the stack will be as follows:
Line 3: mov %esp, %ebp
Now, in order to formalise the creation of the new frame, we need to point our EBP register to the beginning of the frame that we are creating. At the moment, the current value of ESP is pointing to where the new frame should be created, so it is only then appropriate that we assign the current value of ESP to EBP.
The address pointing to the beginning of every frame always contains a reference to beginning of the previous frame (i.e. the value of the previous EBP). This is why we pushed EBP on top of the stack in the previous instruction. Once the previous EBP is saved on top of the stack, we update our EBP to point to the base of our current frame. That is what’s happening in this instruction.
So essentially, what happens in this instruction is:
- Move the contents of ESP to EBP
After this line has finished executing, the current state of the stack will be as follows:
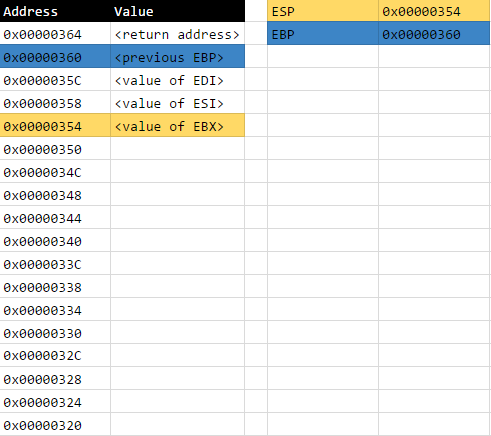
Lines 4, 5, and 6: pushl %edi; pushl %esi; pushl %ebx;
In lines 4, 5, and 6, we’re simply pushing DWORDS on top of the stack. These are allocations for the local variables of the frame. This would be the equivalent of declaring three integer variables in C.
In case you were wondering, function parameters are stored before the return address and they’re not displayed in the stack diagrams that I have placed in the previous sections. For more information on the stack frame format, kindly refer to this image: https://en.wikipedia.org/wiki/Call_stack#/media/File:Call_stack_layout.svg.
So essentially, what’s happening in these instructions are:
- Decrease ESP by 4
- Write the current contents of EDI to the address pointed to by ESP
- Decrease ESP by 4
- Write the current contents of ESI to the address pointed to by ESP
- Decrease ESP by 4
- Write the current contents of EBX to the address pointed by ESP
After these lines have finished executing, the current state of the stack will be as follows:
Line 7: sub $0x90, %esp
In this instruction, we’re allocating an array which can contain up to 144 bytes or 36 DWORDs. If this was C, this would be the equivalent of declaring int[36] var;. The dollar sign in the 0x90 constant is just compliance to an assembler requirement where constants need to have dollar signs prepended onto them.
Essentially, what’s happening in this instruction is:
- Subtract ESP by
0x90or144
After this instruction, the current state of the stack will be as follows:

Lines 8, 9, 10, and 11: movl $0x1, (%esp); movl $0x2, 0x4(%esp); movl $0x3, 0x8(%esp); movl $0x4, 0xc(%esp);
In these series of instructions, we’re just assigning values into the array that we allocated in the previous instruction.
Essentially, what’s happening in this series of instructions is:
- Place the value of
0x1into the firstDWORDslot of the array (offset 0 from ESP) - Place the value of
0x2into the secondDWORDslot of the array (offset 4 from ESP) - Place the value of
0x3into the thirdDWORDslot of the array (offset 8 from ESP) - Place the value of
0x4into the fourthDWORDslot of the array (offset 12 from ESP)
Once this series of instructions have finished executing, the current state of the stack will be as follows:
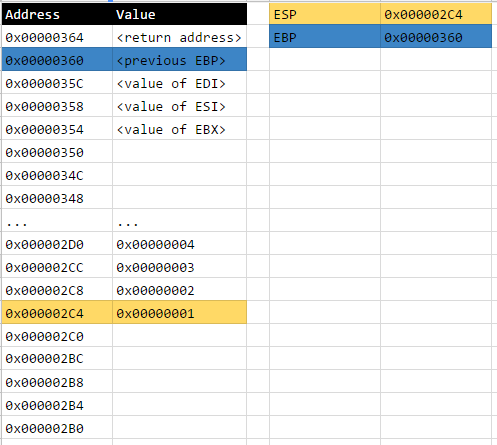
At this point, the program has pretty much finished executing and we can now find the number of bytes between the location of the return address of the current frame and the top of the stack.
Alright, so…
The top of the stack is tracked by the ESP register, so that means the top of the stack is located at 0x000002C4.
The return address of the current frame is located at 0x00000364 if you look at the final stack diagram above.
The number of the bytes between the two locations is 0x00000364 - 0x000002C4 = 0x000000A0.
The problem states that we should remove leading zeroes from the answer, so the answer should be just 0xa0.
Therefore, the flag is 0xa0.
If you want to skip the step-by-step instructions that I’ve laid out above, you can just refer to the annotated code I’ve placed in the code section below:
foo:                        # esp -= 0x4 ; *esp =  ; When function is called, return address gets pushed to the stack (4 bytes)
    pushl %ebp              # esp -= 0x4 ; *esp = %ebp ; Push base pointer of parent frame (4 bytes)
    mov %esp, %ebp          # ebp = esp ; Set base pointer of current frame - that is, the current top of the stack at this point
    pushl %edi              # esp -= 0x4 ; *esp = %edi ; Push integer value in %edi
    pushl %esi              # esp -= 0x4 ; *esp = %esi ; Push integer value in %esi
    pushl %ebx              # esp -= 0x4 ; *esp = %ebx ; Push integer value in %ebx
    sub $0x90, %esp         # esp -= 0x90 ; Move up the stack by 144 bytes (lower address, higher up in stack)
    movl $0x1, (%esp)       # *(esp + 0x00) = 0x00000001 ; Place 0x1 as 1st element in array (length: 4 bytes)
    movl $0x2, 0x4(%esp)    # *(esp + 0x04) = 0x00000002 ; Place 0x2 as 2nd element in array (length: 4 bytes)
    movl $0x3, 0x8(%esp)    # *(esp + 0x08) = 0x00000003 ; Place 0x3 as 3rd element in array (length: 4 bytes)
    movl $0x4, 0xc(%esp)    # *(esp + 0x0c) = 0x00000004 ; Place 0x4 as 4th element in array (length: 4 bytes)

# a = value of esp at the end of the code = ebp - 0x9c
# b = location of the saved return address = ebp + 0x4
# x = b - a
# x = (ebp + 0x4) - (ebp - 0x9c)
# x = (ebp + 0x4) + (-ebp + 0x9c)
# x = 0x4 + 0x9c
# x = 0xa0
# flag = 0xa0
Level 2 – Reverse Engineering 75 (Programmers Assemble)
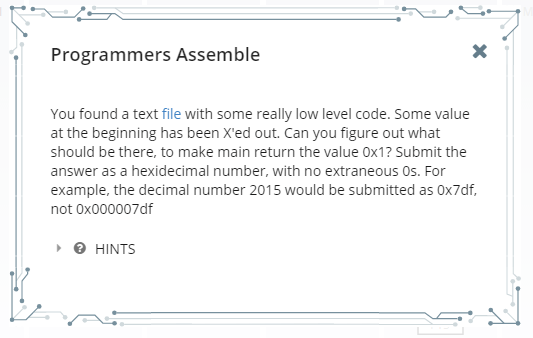
This problem provides yet another piece of assembly code that we need to trace. For the convenience of both of us, I’ve pasted the assembly code in question in the following code block:
.global main

main:
    mov $XXXXXXX, %eax
    mov $0, %ebx
    mov $0x4, %ecx
loop:
    test %eax, %eax
    jz fin
    add %ecx, %ebx
    dec %eax
    jmp loop
fin:
    cmp $0x6ed0, %ebx
    je good
    mov $0, %eax
    jmp end
good:
    mov $1, %eax
end:
    ret
Alright. So the problem is asking us to determine the appropriate value for the missing constant in line 4 . The required value must allow the function to execute in such a way that it would return a value of 1.
Before we move on, we need to know a couple of fun facts about returning values from functions first.
In the assembly code generated by gcc, the EAX register is typically designated as the “return register”. That means that when the ret instruction is executed after a function finishes executing, the code in the context of the previous frame treats the contents of the EAX register as the return value for the function that was just invoked. That’s why the good section in the piece of code I pasted above moves the value of 1 into the EAX register.
Knowing this, it is then our objective to know the appropriate value of the missing constant so that the good section of the code gets executed.
In order to simplify our plight, I’ve added some pseudo-code annotations into the assembly code that was provided to us. You can find them in the code section below:
.global main

main:
    mov $XXXXXXX, %eax   # eax =
    mov $0, %ebx         # ebx = 0x0
    mov $0x4, %ecx       # ecx = 0x4
loop:
    test %eax, %eax      # zf = eax == 0
    jz fin               # if zf: goto fin
    add %ecx, %ebx       # ebx += ecx
    dec %eax             # eax -= 1
    jmp loop             # goto loop
fin:
    cmp $0x6ed0, %ebx    # eq = ebx == 0x6ed0
    je good              # if eq: goto good
    mov $0, %eax         # eax = 0
    jmp end              # goto end
good:
    mov $1, %eax         # eax = 1
end:
    ret                  # return eax
Now that makes things a little easier, don’t you agree?
Alright. Now if you look at each of the defined sections in the code, you’ll find that they’re pretty much just doing the following:
- The
mainsection simply initialises the registers that we will be using - The
loopsection repeatedly adds the value of ECX to EBX, EAX number of times - The
finsection checks if EBX is equal to0x6ed0and returns 1 (via thegoodsection) if it is. If it’s not, it returns 0 - The
goodsection does the actual assignment of 1 to EAX before returning
Now we have a better idea of what we need to put in the missing constant.
Looking at the description of the loop and fin sections, we can find out that EAX needs to contain the number of 0x4s (the value of ECX never changes) that need to be accumulated into the EBX register so that the value inside the EBX register would be equal to 0x6ed0.
The equation essentially is: 0x04 * eax = 0x6ed0.
Now let’s do a little algebra:
0x04 * eax = 0x6ed0
eax = 0x6ed0 / 0x04
eax = 0x1bb4
The value of EAX must be 0x1bb4 so that EBX would end up with a value of 0x6ed0. This in turn would allow the function to return a value of 1.
Therefore, our flag is 0x1bb4.
Level 2 – Binary Exploitation 75 (I’ve Got a Secret)

This problem gives you a service that you have to exploit and it also provides you the source code for the service in question as a download. In a nutshell, the service generates a random secret value that you have to guess in order for the service to give you the flag.
For our convenience, I’ve pasted the code that the problem provides in the code section below:
#include
#include
#include
#include
#define BUF_LEN 64
char buffer[BUF_LEN];
int main(int argc, char** argv) {
int fd = open("/dev/urandom", O_RDONLY);
if(fd == -1){
puts("Open error on /dev/urandom. Contact an admin\n");
return -1;
}
int secret;
if(read(fd, &secret, sizeof(int)) != sizeof(int)){
puts("Read error. Contact admin!\n");
return -1;
}
close(fd);
printf("Give me something to say!\n");
fflush(stdout);
fgets(buffer, BUF_LEN, stdin);
printf(buffer);
int not_secret;
printf("Now tell my secret in hex! Secret: ");
fflush(stdout);
scanf("%x", ¬_secret);
if(secret == not_secret){
puts("Wow, you got it!");
system("cat ./flag.txt");
}else{
puts("As my friend says,\"You get nothing! You lose! Good day, Sir!\"");
}
return 0;
}If you look at line 24 where it says printf(buffer);, you’d immediately know that this program has a format string injection vulnerability. This vulnerability will allow us to pry into the contents of stack memory and extract the value of the secret variable.
Now let’s go over a brief rundown of what a format string injection vulnerability is.
You know those times when you print a variable using printf? Yeah, you use format strings to do that. For example, printf("%s", string);. The first parameter of printf is the format string and the second parameter is the value to be included in the formatted result.
References to values in a format string are indicated by % in printf and each reference to a value is retrieved further down the stack the further it’s ordinal position in the format string is. If you have too many value references in printf and not enough parameters, printf will still look further down the stack for a value it could work with, hence, printing the contents of memory. If we then allow users to arbitrarily enter format strings to print, they can create any number of value references that they wish, which would lead to arbitrary memory reading.
This is what we’re going to leverage in order to acquire the secret value.
So if you look at lines 21 to 24, you’d see that our point of entry is where the service asks the user to “Give me something to say!”. Knowing this, let’s open up a connection to the service and give it what it wants.

OK. Let’s try putting in some format strings in there.

Awesome. So what you’re seeing here is the six top-most DWORDs of the stack. This actually contains the value that we want but I will be explaining a bit later on which value it is and why. As you can see above, we can arbitrarily read stack values if we are allowed to inject a format string into printf.
Alright. So in order to retrieve the secret value, we must understand the stack frame format yet again.

As you can see, from the top of the stack, you get to access local variables of the current function first, then the return address of the current function, and then the parameters of the current function, and only then would you start encountering the locals of the parent function.
Now. When the program enters printf, it passes the format string and parameters to another function called vprintf which does the actual retrieval and printing of stack values.
So, at the moment that vprintf is called, the first %x in the format string that we supplied above actually gave us the value of the done variable which is 0x40. The second %x in the format string gave us the value of the arg variable which is 0xf7fc7c20. And since there are no more local variables, the third %x actually gave us the return address of the printf function which is 0x8048792. Finally, since there is one parameter that was provided to the printf function (this is in the context of the printf called in line 24 by the way) the fourth %x actually gave us the value of the buffer variable which is 0x1. This one actually gave me some confidence about my mind map of the stack because the buffer variable is a global variable and is therefore stored on the data section of the program, and that’s generally on lower memory addresses.
Now since we’ve already went through the locals of printf, it’s return address, and parameters, the next values returned by the format string shall be those of the parent function’s (which is main).
So the main function contains three local variables, namely not_secret, secret, and fd. You already know how this works. The fifth %x of the format string that we provided gave us the value of the not_secret variable which is 0xffffdd34 (it’s uninitialised at this point), and finally, the sixth %x of the format string gave us the value of the secret variable, which is 0x2a63a11a.
Now all that’s left to do is tell the service it’s secret and we’d have the flag right in our hands.
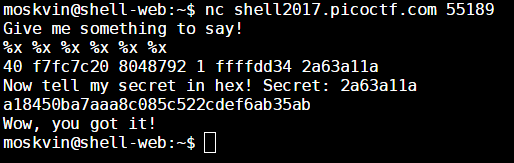
The flag is a18450ba7aaa8c085c522cdef6ab35ab.
Level 2 – Binary Exploitation 95 (VR Gear Console)
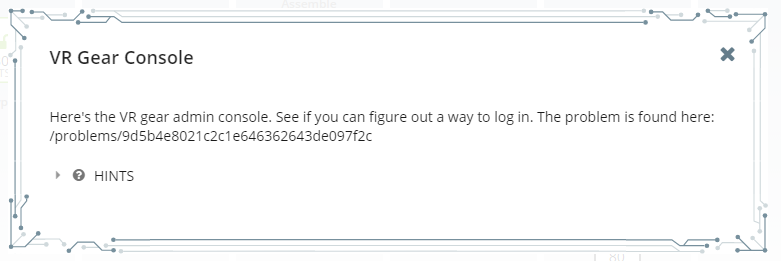
Alright. For this problem, just cd over to the specified folder in the web console and execute the vrgearconsole program.
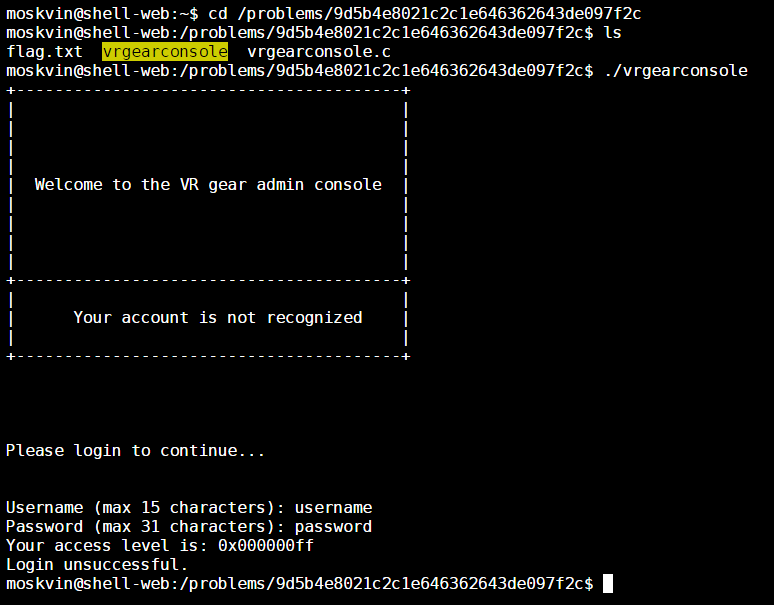
Reading the flag.txt file leads to an “Access Denied” message so I’m not going to bother posting the screenshot.
Anyway, it seems that in this challenge, we’re going to have to exploit some input validation problem yet again. Good thing they provided us the source code! I’ve pasted it onto the code section below for our convenience:
#include
#include

int login() {
    int accessLevel = 0xff;
    char username[16];
    char password[32];
    printf("Username (max 15 characters): ");
    gets(username);
    printf("Password (max 31 characters): ");
    gets(password);

    if (!strcmp(username, "admin") && !strcmp(password, "{{ create_long_password() }}"))
{
        accessLevel = 2;
    } else if (!strcmp(username, "root") && !strcmp(password, "{{ create_long_password()
}}")) {
        accessLevel = 0;
    } else if (!strcmp(username, "artist") && !strcmp(password, "my-password-is-secret"))
 {
        accessLevel = 0x80;
    }

    return accessLevel;
}

int main(int argc, char **argv) {
    setbuf(stdout, NULL);
    printf(
        "+----------------------------------------+\n"
        "|                                        |\n"
        "|                                        |\n"
        "|                                        |\n"
        "|                                        |\n"
        "|  Welcome to the VR gear admin console  |\n"
        "|                                        |\n"
        "|                                        |\n"
        "|                                        |\n"
        "|                                        |\n"
        "+----------------------------------------+\n"
        "|                                        |\n"
        "|      Your account is not recognized    |\n"
        "|                                        |\n"
        "+----------------------------------------+\n"
        "\n\n\n\n"
        "Please login to continue...\n\n\n"
    );
    int access = login();

    printf("Your access level is: 0x%08x\n", access);

    if (access >= 0xff || access <= 0) {
        printf("Login unsuccessful.\n");
        exit(10);
    } else if (access < 0x30) {
        printf("Admin access granted!\n");
        printf("The flag is in \"flag.txt\".\n");
        system("/bin/sh");
    } else {
        printf("Login successful.\n");
        printf("You do not have permission to access this resource.\n");
        exit(1);
    }
}
Alright. Looking at the main function, it seems that the program will give us access to the flag if we can set the access variable to a value that is less than 0x30 but more than 0x00. If we look at where the access variable is set, we can see that it is set to the value returned by the login function. It’s very likely then that our point of entry will lie somewhere in that function.
Now let’s take a look at the login function. It’s very obvious from the get-go that this is a stack-smashing problem since a couple of calls to the gets function is in there.
If you haven’t heard yet, the gets function takes an input from the Standard Input (usually the console) and places it onto the specified buffer (an array in this case) without any sort of boundary checking. This means that if the input is larger than the destination buffer, the input will spill-over into an area beyond the intended destination, usually onto other local variables in the current stack frame. This allows for arbitrary overwriting of local variables if those local variables are in a lower part of the stack relative to the buffer being written onto.
In this case, the accessLevel variable is in a lower part of the stack relative to either the username and password arrays since it was defined first, therefore calls to the gets function eyeing those arrays as destination buffers have the potential of overwriting the accessLevel variable given that we provide the call to gets the appropriate amount of characters via console.
Let’s try inducing a buffer overflow in the username array in this case since it’s closer the the accessLevel variable.
So in order to induce a buffer overflow, we just need to provide 16 characters when we are prompted for a username, and then append an additional four characters to that which will spill over into the accessLevel variable.
The raw value of the concatenation of the additional four characters must have a value that is less than 0x30 but greater than 0, but since the accessLevel variable was already initialised to 0xff, it’s “upper” three bytes have been set to zero already and so we just need to overwrite the portion of accessLevel that was set to 0xff.
If you recall your computer architecture class, most systems operate under a “big endian” scheme where the lower part of an int is stored on a lower memory address and the bigger part of an int is stored on a higher memory address (see https://en.wikipedia.org/wiki/Endianness#/media/File:Big-Endian.svg). This means that gets will write onto the lower part of accessLevel first, therefore, we just need to append an additional character into the input since just one character is enough to overwrite the part of accessLevel that was set to 0xff. Do note that this one character must have an ASCII value that is less than 0x30. In this case, we will be using the slash (“/”) character whose ASCII value is 0x2f.
In order to obtain access to the flag, we just provide the program an input of aaaaaaaaaaaaaaaa/ for the username, and an empty password, and we’d have privileged access to the system that can read the flag.txt file.
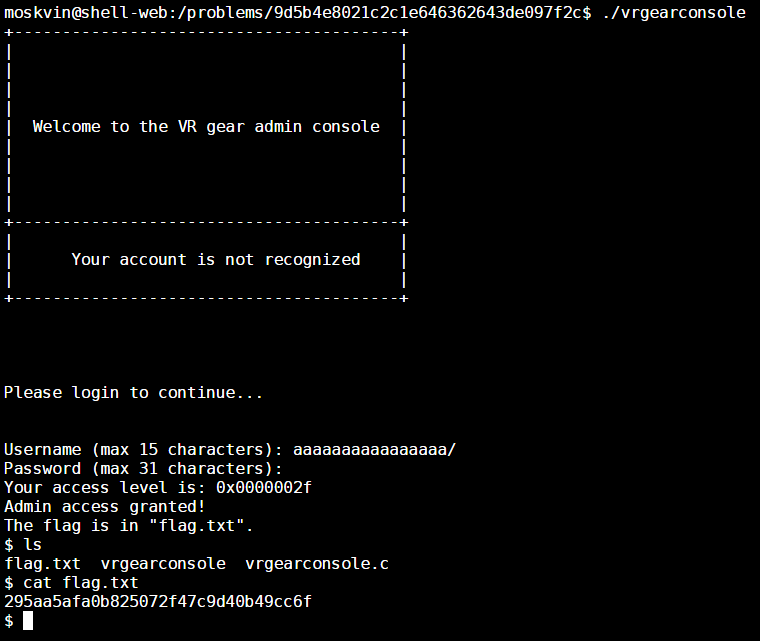
The flag is 295aa5afa0b825072f47c9d40b49cc6f.
Level 2 – Cryptography 75 (SoRandom)
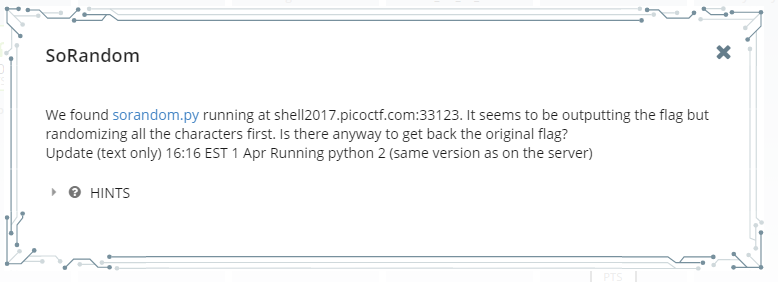
Long story short: connecting to the provided service gives us a string which goes: Unguessably Randomized Flag: BNZQ:2m8807395d9os2156v70qu84sy1w2i6e. It is suggested that this string contains the flag but it has been encrypted in some way.
The provided Python file shows us the algorithm for encrypting the flag. I’ll paste it into the following code section for our convenience:
#!/usr/bin/python -u
import random,string

flag = "FLAG:"+open("flag", "r").read()[:-1]
encflag = ""
random.seed("random")
for c in flag:
  if c.islower():
    #rotate number around alphabet a random amount
    encflag += chr((ord(c)-ord('a')+random.randrange(0,26))%26 + ord('a'))
  elif c.isupper():
    encflag += chr((ord(c)-ord('A')+random.randrange(0,26))%26 + ord('A'))
  elif c.isdigit():
    encflag += chr((ord(c)-ord('0')+random.randrange(0,10))%10 + ord('0'))
  else:
    encflag += c
print "Unguessably Randomized Flag: "+encflag
OK. So looking at the script, it looks like a Caesar Cipher where every character is shifted a random number of times.
Since the random module has been provided a deterministic seed, the random.randrange function is going to give a deterministic sequence of values as well. That means the key for decrypting the first character of the encrypted flag is the result of the first call to random.randrange given that random has been seeded with the string “random” beforehand.
Our algorithm is pretty much going to be the following:
random.seed("random")
target = 'BNZQ:2m8807395d9os2156v70qu84sy1w2i6e'

flag = ''
for t in target:
    k = key(t)
    c = decrypt(t, k)
    flag += c

print flag
The key function returns the appropriate key for the provided character at that index.
def key(t):
    if t.islower():
        return random.randrange(0, 26)
    elif t.isupper():
        return random.randrange(0, 26)
    elif t.isdigit():
        return random.randrange(0, 10)
    return None
And the decrypt function pretty much subtracts the key from the cipher-text as opposed to adding it like what was done during encryption.
def decrypt(t, k):
    if t.islower():
        return chr((ord(t)-ord('a')-k)%26 + ord('a'))
    elif t.isupper():
        return chr((ord(t)-ord('A')-k)%26 + ord('A'))
    elif t.isdigit():
        return chr((ord(t)-ord('0')-k)%10 + ord('0'))
    else:
        return t
The final decryption script is as follows:
#!/usr/bin/python
import random

def key(t):
    if t.islower():
        return random.randrange(0, 26)
    elif t.isupper():
        return random.randrange(0, 26)
    elif t.isdigit():
        return random.randrange(0, 10)
    return None

def decrypt(t, k):
    if t.islower():
        return chr((ord(t)-ord('a')-k)%26 + ord('a'))
    elif t.isupper():
        return chr((ord(t)-ord('A')-k)%26 + ord('A'))
    elif t.isdigit():
        return chr((ord(t)-ord('0')-k)%10 + ord('0'))
    else:
        return t

random.seed("random")
target = 'BNZQ:2m8807395d9os2156v70qu84sy1w2i6e'

flag = ''
for t in target:
    k = key(t)
    c = decrypt(t, k)
    flag += c

print flag
Make sure you run this on the picoCTF shell-web machine because the platform and Python versions also affect the random module. I saved this script in my instance of the shell-web machine and named it sorandomdecrypt.py.

And there we go! The flag is 9b6098160b2ca5139c83fe29fd7c9e5d.
Level 3 – Reverse Engineering 165 (Much Ado About Hacking)

This one is a pretty fun challenge.
Basically the problem hands you a piece of source code written in the Shakespeare Programming Language. It’s one of those weird esoteric programming languages that was probably written as a joke.
Anyway, at first sight, the file looks like a simple text file containing the script for a stage play, but if you thoroughly read the summary of the language in Wikipedia, you’ll get an idea on what sort of rules exist in the language for defining instructions, variables, conditions, sections, etc.
Once we take a closer look at the logic of the program, we’ll find that it actually asks for input and prints output onto the screen. The goal of the challenge is to come up with an input string which will generate the output: tu1|\h+&g\OP7@% :BH7M6m3g=.
For our convenience, I’ve pasted the source code of the program in the code section below:
Much Ado About Hacking.

Benedick, a budding young hacker.
Beatrice, a veteran exploiter.
Don Pedro, a good friend of the others.
Don John, he is just kinda there.
Achilles,  I thought he was from Greece.
Cleopatra, now this is just getting ridiculous.


					  Act I: Also the last act.

				 Scene I: Benedick learns his place.

[Enter Beatrice and Don John]

Beatrice:
You are nothing!

[Exit Don John]
[Enter Don Pedro]

Beatrice:
You are nothing!

[Exit Don Pedro]
[Enter Achilles]

Beatrice:
You are as proud as a bold brave gentle noble amazing hero.

[Exit Achilles]
[Enter Cleopatra]

Beatrice:
You are as vile as the difference between a beautiful gentle bold fair peaceful sunny lovely flower and Achilles.

[Exit Cleopatra]
[Enter Benedick]

Beatrice:
You are nothing!

			  Scene II: Benedick strengthens his memory.

Beatrice:
Open your mind! Remember yourself.

Benedick:
You are as red as the sum of yourself and a tree.
Am I as lovely as a cunning charming honest peaceful bold pony?

Beatrice:
If not, let us return to scene II.

Benedick:
You are as worried as the sum of yourself and a Microsoft.

Beatrice:
Recall your father's disappointment!

		Scene III: Benedick teaches his friends about hacking.

Beatrice:
Recall your latest blunder! You are as smelly as the difference between yourself and Achilles.

Benedick:
You are as disgusting as the sum of yourself and a flirt-gill!

[Exit Beatrice]
[Enter Don John]

Benedick:
Thou art as damned as I.

[Exit Don John]
[Enter Don Pedro]

Don Pedro:
You are as rotten as the sum of yourself and myself.
Thou art as normal as the remainder of the quotient between thyself and Cleopatra.

[Exit Benedick]
[Enter Don John]

Don John:
You are as good as I.

[Exeunt]
[Enter Beatrice and Benedick]

Beatrice:
You are as foul as the sum of yourself and Achilles. Speak your mind!

Benedick:
Are you better than nothing?

Beatrice:
If so, let us return to scene III.

[Exeunt]
Now, upon analyzing the source code above, one of the most notable findings we’ll see is that Beatrice is actually pretty freaking savage.
Anyway, in order to make it easier to understand the logic of the Shakespeare program, we can use this nifty little tool called spl2c which converts Shakespeare programs into C programs. The tool can be found in this StackOverflow thread as pointed out by the “Hints” section of the problem.
Once you get that setup, you can then convert the Shakespeare program into C and you’ll end up with an output similar to the one in the code section below. To make it easier to understand, I added some Pythonic annotations to the code.
/********************************************************************
 *   This C program was generated by spl2c, the Shakespeare to C    *
 *          converter by Jon Åslund and Karl Hasselström.           *
 ********************************************************************/

/* libspl definitions and function prototypes */
#include "spl.h"

int main(void)
{
  /******************************************************************
   * MUCH ADO ABOUT HACKING                                         *
   ******************************************************************/

  CHARACTER *benedick;                    /* a budding young hacker */
  CHARACTER *beatrice;                    /* a veteran exploiter */
  CHARACTER *don_pedro;                   /* a good friend of the others */
  CHARACTER *don_john;                    /* he is just kinda there */
  CHARACTER *achilles;                    /* I thought he was from Greece */
  CHARACTER *cleopatra;                   /* now this is just getting ridiculous */

  int comp1, comp2;

  global_initialize();

  benedick = initialize_character("Benedick");
  beatrice = initialize_character("Beatrice");
  don_pedro = initialize_character("Don Pedro");
  don_john = initialize_character("Don John");
  achilles = initialize_character("Achilles");
  cleopatra = initialize_character("Cleopatra");

  act_i:                                  /* Also the last act */

  act_i_scene_i:                          /* Benedick learns his place */

  // don_john.value = 0
  enter_scene(15, beatrice);
  enter_scene(15, don_john);

  activate_character(20, beatrice);
  assign(18, second_person, 0);

  exit_scene(20, don_john);

  // don_pedro.value = 0
  enter_scene(21, don_pedro);

  activate_character(26, beatrice);
  assign(24, second_person, 0);

  exit_scene(26, don_pedro);

  // achilles.value = 32
  enter_scene(27, achilles);

  activate_character(32, beatrice);
  assign(30, second_person, 2*2*2*2*2*1);

  exit_scene(32, achilles);

  // cleopatra.value = 128 - achilles
  enter_scene(33, cleopatra);

  activate_character(38, beatrice);
  assign(36, second_person, int_sub(36, 2*2*2*2*2*2*2*1, achilles->value));

  exit_scene(38, cleopatra);

  // benedick.value = 0
  enter_scene(39, benedick);

  activate_character(44, beatrice);
  assign(42, second_person, 0);

  act_i_scene_ii:                         /* Benedick strengthens his memory */

  // benedick.value = getchar()
  // benedick.push(benedick.value)
  activate_character(49, beatrice);
  char_input(47, second_person);
  push(47, second_person, value_of(47, second_person));

  // beatrice.value = beatrice.value + 1
  activate_character(53, benedick);
  assign(50, second_person, int_add(50, value_of(50, second_person), 1));

  // flag = benedick.value == 32
  comp1 = value_of(51, first_person);
  comp2 = 2*2*2*2*2*1;
  truth_flag = (comp1 == comp2);

  // if not flag: goto act_i_scene_ii
  activate_character(56, beatrice);
  if (!truth_flag) {
    goto act_i_scene_ii;
  }

  // beatrice.value = beatrice.value - 1
  activate_character(59, benedick);
  assign(57, second_person, int_add(57, value_of(57, second_person), (-1)));

  // benedick.value = benedick.pop()
  activate_character(62, beatrice);
  pop(60, second_person);

  act_i_scene_iii:                        /* Benedick teaches his friends about hacking */

  // benedick.value = benedick.pop()
  // benedick.value = benedick.value - achilles.value
  activate_character(67, beatrice);
  pop(65, second_person);
  assign(65, second_person, int_sub(65, value_of(65, second_person), achilles->value));

  // beatrice.value = beatrice.value - 1
  activate_character(70, benedick);
  assign(68, second_person, int_add(68, value_of(68, second_person), (-1)));

  exit_scene(70, beatrice);

  enter_scene(71, don_john);

  // don_john.value = benedick.value
  activate_character(76, benedick);
  assign(74, second_person, value_of(74, first_person));

  exit_scene(76, don_john);

  enter_scene(77, don_pedro);

  // benedick.value = benedick.value + don_pedro.value
  // benedick.value = benedick.value % cleopatra.value
  activate_character(83, don_pedro);
  assign(80, second_person, int_add(80, value_of(80, second_person), value_of(80, first_person)));
  assign(81, second_person, int_mod(81, value_of(81, second_person), cleopatra->value));

  exit_scene(83, benedick);

  enter_scene(84, don_john);

  // don_pedro.value = don_john.value
  activate_character(89, don_john);
  assign(87, second_person, value_of(87, first_person));

  exit_scene_all(89);

  enter_scene(90, beatrice);
  enter_scene(90, benedick);

  // benedick.value = benedick.value + achilles.value
  // print (char) benedick.value
  activate_character(95, beatrice);
  assign(93, second_person, int_add(93, value_of(93, second_person), achilles->value));
  char_output(93, second_person);

  // flag = beatrice.value > 0
  activate_character(98, benedick);
  comp1 = value_of(96, second_person);
  comp2 = 0;
  truth_flag = (comp1 > comp2);

  // if flag: goto act_i_scene_iii
  activate_character(101, beatrice);
  if (truth_flag) {
    goto act_i_scene_iii;
  }

  exit_scene_all(101);

  return 0;
}
After that, I simplified it further by turning the annotations and some parts of the C program into Pythonic pseudo-code:
  benedick = initialize_character("Benedick");
  beatrice = initialize_character("Beatrice");
  don_pedro = initialize_character("Don Pedro");
  don_john = initialize_character("Don John");

  act_i:

    act_i_scene_i:

      // initialize variables to zero
      don_john.value = 0
      don_pedro.value = 0
      benedick.value = 0

    act_i_scene_ii:

      // get input string and stroe in benedick stack; terminate with space
      // store space character in benedick value
      // store input string length in beatrice value exclusive of space
      benedick.value = read()
      benedick.push(benedick.value)
      beatrice.value++
      if not benedick.value == 32:
        goto act_i_scene_ii
      beatrice.value--
      benedick.value = benedick.pop()

    act_i_scene_iii:

      // pop last character and decrease string length
      // adjust character
      benedick.value = benedick.pop()
      benedick.value-= 32
      beatrice.value--

      // remember original adjusted value of current character
      don_john.value = benedick.value

      // add current adjusted character to previous adjusted character and modulo by 96
      benedick.value+= don_pedro.value
      benedick.value%= 96

      // remember original value of current adjusted character for next operation
      don_pedro.value = don_john.value

      // unadjust character
      benedick.value+= 32

      // print the value of the current character after manipulation
      print (char) benedick.value

      // if some characters are remaining, handle them in another iteration
      if beatrice.value > 0:
        goto act_i_scene_iii
Alright. So, in the only “act” (essentially, a goto label) in the program, there are three scenes (which are also goto labels).
The first scene simply initializes the values of the variables that exist in the program.
The second scene reads a string from the user and stores it on Benedick’s mind while Beatrice tracks the length of the string from the user.
What do I mean by that, you ask? Well first of all, all variables in the Shakespeare language can only be play characters from Shakespeare’s work. Each character has a value attribute and a stack attribute. You can directly assign values to a character’s value attribute and you can also push values into their stack attribute. If you pop a character’s stack, the top most value in their stack gets removed and then gets assigned to their value attribute. Now, in the language syntax, you tell characters to “recall” something in order to pop their stack, and you tell them to “remember” in order to push into their stack. That’s why I referred to Benedick’s stack as his “mind”. Additionally, in order to ask the user for input, you tell characters to “open their mind”.
The third scene is where it gets tricky. Upon analyzing the Pythonic pseudo-code I wrote above, I believe that it does some sort of chained Caesar cipher on each of the characters in the input string starting from the last character up until the first character. By “chained”, I mean that the offset for shifting each character depends on the difference between the ASCII value of the last character and 32 (space).
Essentially, the formula for getting one character of output is: output[n] = (((input[n]-32) + (n>0)?(input[n-1]-32):0) % 96) + 32.
After it does the cipher for one character, the program checks if there are anymore characters to shift. If yes, it repeats the third scene and pops the next character to encrypt from Benedick’s stack. Else, the program exits.
So, again, our desired result is tu1|\h+&g\OP7@% :BH7M6m3g=. In order to get each of these characters, we just need to substitute them into the formula we defined above.
The following code section displays my solutions for finding each of the input characters required to generate the desired output:
't' ; 116 = (((input[00]-32) + 0) % 96) + 32        ; input[00] = 116 ; input = 't' ;
'u' ; 117 = (((input[01]-32) + (116-32)) % 96) + 32 ; input[01] = 033 ; input = '!' ;
'1' ; 049 = (((input[02]-32) + (033-32)) % 96) + 32 ; input[02] = 048 ; input = '0' ;
'|' ; 124 = (((input[03]-32) + (048-32)) % 96) + 32 ; input[03] = 108 ; input = 'l' ;
'\' ; 092 = (((input[04]-32) + (108-32)) % 96) + 32 ; input[04] = 112 ; input = 'p' ;
'h' ; 104 = (((input[05]-32) + (112-32)) % 96) + 32 ; input[05] = 120 ; input = 'x' ;
'+' ; 043 = (((input[06]-32) + (120-32)) % 96) + 32 ; input[06] = 051 ; input = '3' ;
'&' ; 038 = (((input[07]-32) + (051-32)) % 96) + 32 ; input[07] = 115 ; input = 's' ;
'g' ; 103 = (((input[08]-32) + (115-32)) % 96) + 32 ; input[08] = 116 ; input = 't' ;
'\' ; 092 = (((input[09]-32) + (116-32)) % 96) + 32 ; input[09] = 104 ; input = 'h' ;
'O' ; 079 = (((input[10]-32) + (104-32)) % 96) + 32 ; input[10] = 103 ; input = 'g' ;
'P' ; 080 = (((input[11]-32) + (103-32)) % 96) + 32 ; input[11] = 105 ; input = 'i' ;
'7' ; 055 = (((input[12]-32) + (105-32)) % 96) + 32 ; input[12] = 078 ; input = 'N' ;
'@' ; 064 = (((input[13]-32) + (078-32)) % 96) + 32 ; input[13] = 114 ; input = 'r' ;
'%' ; 037 = (((input[14]-32) + (114-32)) % 96) + 32 ; input[14] = 051 ; input = '3' ;
' ' ; 032 = (((input[15]-32) + (051-32)) % 96) + 32 ; input[15] = 109 ; input = 'm' ;
':' ; 058 = (((input[16]-32) + (109-32)) % 96) + 32 ; input[16] = 077 ; input = 'M' ;
'B' ; 066 = (((input[17]-32) + (077-32)) % 96) + 32 ; input[17] = 117 ; input = 'u' ;
'H' ; 072 = (((input[18]-32) + (117-32)) % 96) + 32 ; input[18] = 083 ; input = 'S' ;
'7' ; 055 = (((input[19]-32) + (083-32)) % 96) + 32 ; input[19] = 100 ; input = 'd' ;
'M' ; 077 = (((input[20]-32) + (100-32)) % 96) + 32 ; input[20] = 105 ; input = 'i' ;
'6' ; 054 = (((input[21]-32) + (105-32)) % 96) + 32 ; input[21] = 077 ; input = 'M' ;
'm' ; 109 = (((input[22]-32) + (077-32)) % 96) + 32 ; input[22] = 064 ; input = '@' ;
'3' ; 051 = (((input[23]-32) + (064-32)) % 96) + 32 ; input[23] = 115 ; input = 's' ;
'g' ; 103 = (((input[24]-32) + (115-32)) % 96) + 32 ; input[24] = 116 ; input = 't' ;
'=' ; 061 = (((input[25]-32) + (116-32)) % 96) + 32 ; input[25] = 073 ; input = 'I' ;
I know that there are more than one possible solutions for each of the input since the modulo operation is involved, but try to select the value of a displayable character (i.e. one between 32 and 127).
Anyway the list of inputs that you will end up with is reversed because it is the last value that is encrypted and printed onto the screen first given that the input characters were pushed and popped from a stack which we all know operates on a first-in-last-out basis.
In order to get the flag, you just need to reverse the input characters.
The flag is Its@MidSuMm3rNights3xpl0!t.
This concludes my write-up for the picoCTF 2017 event for now. I might solve some of the other challenges in there since it still seems to be open despite the contest having closed last April 14, so stay tuned!